Contacts
Managing your contacts
My Contacts
Contacts can be registered individually or by importing a CSV file. The only mandatory field is the Contact Name.
Individual Registration is done by clicking New Contact in the upper right corner of the screen, where you will have access to the registration fields.
Access to Registration Types

On the Individual Registration screen you can insert:
- An Image/Avatar of the contact
- Switch the type of registration between Corporate or Individual
- Add up to 10 phone numbers per contact
- Add Custom Fields – flexible fields that can be created according to each organization’s needs
Custom Field Registration

To perform bulk registration, use the CSV file import option, which can be accessed in the upper right corner of the screen as shown in the image Access to Registration Types.
On the CSV file import screen, a sample file is available with the required fields and formats to ensure the import works correctly.
CSV Import Screen

Note that:
-
The fields are separated by semicolons (;)
-
Only the Name field is mandatory
-
The contact_gender field accepts only Male / Female / Not Informed, or it may be left blank
-
The phone number must be registered with Country Code (DDI) + Area Code (DDD) + Phone Number
-
There is a particularity for registering custom fields:
- All custom fields must be enclosed in square brackets []
- Inside double quotes, the Field Name must be followed by a comma, and the Field Value also enclosed in double quotes
- Each custom field must be separated by a pipe |
Example:
["Billing","20,000"|"Lawyer","Dr. Augusto Martins"|"Secretary","Gabriela Santos"]
Importing Contacts with Portfolio Information
If the goal is to import a contact that already includes portfolio information, the following fields must be filled:
- portfolio – must be filled with the word "true" (lowercase, no spaces)
- portfolio_type – must be filled with the number corresponding to the portfolio flow type to be applied to the contact, where:
- 1 – Message Flow
- 2 – Backup Agent Flow
- 3 – General Queue Flow
- 4 – Follow-Me Flow
- portfolio_user_email – must contain the email of the main portfolio user
- portfolio_service_name / portfolio_agent_serserve_email – must contain either the email of the secondary portfolio user or the name of the service to which the contact should be transferred if the main user is not available

Exploring the "My Contacts" Screen
1. Filters
a. Contact Search – field to perform a direct search for a contact by name
b. Active // Inactive – filter to list contacts that are active or inactive in the organization
c. Without Owner // With Owner – filter to list contacts that are assigned to a portfolio (with owner) or not assigned (without owner)
d. Owners – filter to display users who have a portfolio; this filter will only be active when the "With Owner" filter is selected
e. Portfolio Type – displays the list of existing portfolio flows

2. Actions
a. Select – selects all contacts displayed on the screen
b. Activate – activates the selected contacts
c. Deactivate – deactivates the selected contacts
d. Assign – assigns a flow to add the selected contact to a portfolio
e. Anonymize – fully encrypts the data of the selected contact

3. View Modes
a. List – displays the contacts on the screen in list format
b. Cards – displays the contacts on the screen in card format
To switch to card view, simply click Show Details.

Portfolio Assignment
The customer portfolio is one of the most valuable resources of a company. It refers to the group of clients who purchase or have purchased from your brand. The more organized and qualified this resource is, the greater the chances of increasing sales performance.
Therefore, management and the sales team must organize and develop the customer portfolio, always aiming to build strong relationships and take advantage of the best opportunities to close deals.
The Portfolio Assignment process consists of dividing the company’s clients and linking a salesperson to one or more clients, ensuring that each client has a responsible salesperson.
In Omni, we have developed a way of assigning clients to portfolios so that users can manage flows that best serve both the assigned client and the portfolio owner. This approach focuses on all available media in the platform, ensuring that portfolio assignment is comprehensive and efficient regardless of the communication channel chosen by the client.
Assigning a Contact to a Portfolio
To assign a client to a user’s portfolio, follow these steps:
- Select the contact(s) to be assigned
- Click Assign
- Define which flow will be chosen for the selected contacts
- Define which agent will be the portfolio owner
- Click Assign – a confirmation screen will appear
Note: For portfolio assignment to occur, the contact must not have an open attendance.
Portfolio Flows
When a contact is assigned, every time they reach out to the organization they will have an exclusive user to assist them. However, when the user is unavailable, the attendance will follow the chosen flow. Flow assignment is essential for efficient portfolio management.
1. Message Flow
When the user is on pause, offline, or has reached the maximum number of attendances, the contact will receive a voicemail (for voice) or be placed in the queue (for text).
2. Backup Agent Flow
In the absence of the agent, the contact will be forwarded to the backup agent. If the backup agent is also unavailable, the attendance will follow the Message Flow.
3. General Queue Flow
In the absence of the agent, the contact will be forwarded to the chosen service queue. For voice media, if the client chooses not to be forwarded, they will be redirected to the Message Flow.
Note: For email attendances, only services with email registered in the system should be selected.
4. Follow-Me Flow
For voice attendance, the contact will be transferred to the agent’s registered phone number. For text media, the attendance will follow the Message Flow.
5. Unassign
Removes the existing portfolio assignment from the contact.
Anonymization
Anonymization is already available in Omni, following LGPD regulations. It allows complete control over anonymization to meet possible requests from data subjects.
The purpose of the Anonymization feature is to fully encrypt all contact data in their attendances. Once anonymization is performed, the process cannot be reversed. Therefore, clear rules must be established to ensure users do not perform anonymization without client consent.
Performing Contact Anonymization
The Contact Anonymization function is available in the new version of Omni. Initially, the user must be enabled for anonymization, which is configured through a request made by the Organization Manager.
Step-by-Step for Anonymization
- Access the Contacts screen in the platform
- Select the contact(s) to be anonymized
- Click the Anonymize button
- Confirm the request – attention is required, as this action cannot be reversed
- Re-authorize by entering the user’s login and password, then click Anonymize
- A confirmation message will be displayed automatically, indicating whether the action was successful

Cases in which it will not be possible to anonymize the contact:
- Contact with an open attendance
- Contact with an open survey
- Contact with an open scheduling
In addition to the information that the attempt was unsuccessful, a CSV file will also be available containing the details of each contact for which the action failed.
How the contact will look after anonymization
The encryption keys are generated from a SHA-256 hash protocol. These keys are created at runtime, randomly, and stored within a bucket of indeterminate size, thus anonymizing personal and sensitive data irreversibly, even for the Omni team. This ensures compliance with LGPD through a simple, fast, and effective process.
All contact data will be anonymized in the database, meaning no information about this contact will be available for consultation in the platform.
-
On the Contacts screen:
a. The contact will be inactive
b. Data will be replaced by a randomly generated encrypted identifier created by the platform -
In reports and attendance history:
a. The displayed data will be encrypted, preventing identification of the contact
b. All other attendance data will remain intact in the platform for management of attendance history
Blacklist
The registration of the blacklist, i.e., the phone numbers that will be blocked from making contact, is carried out separately for Inbound and Outbound.
Blacklist Screen

The registration of phone numbers for the Blacklist can be done individually or through CSV import. In both cases, the phone number format must follow the rules:
-
Inbound
- Area Code (DDD) + Phone Number
-
Outbound
- Country Code (DDI) + Area Code (DDD) + Phone Number
Individual Registration Screen

Import Screen
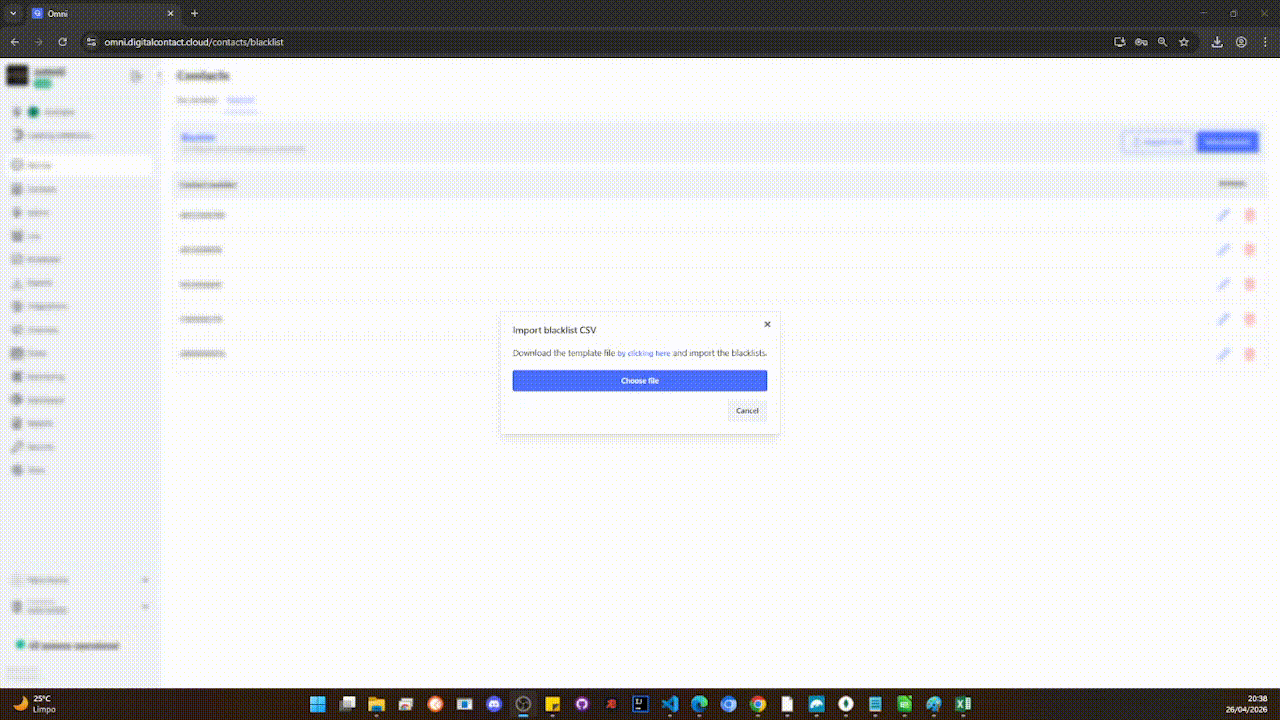
To register the phone number(s), simply click Save on the individual registration screen or Import on the CSV import screen.